Introduction
GSS-TSIG (Generic Security Service Algorithm –Transaction Signature) is used to authenticate DDNS (Dynamic Domain Name System) updates. It is an extension of TSIG authentication that uses the Kerberos v5 authentication system. There are a set of client/server negotiations to establish a “security context” that makes use of a Kerberos server (Microsoft AD domain controller) that functions as the KDC (Kerberos Key Distribution Center). The KDC provides session tickets and temporary session keys to users and computers within an Active Directory Domain. EfficientIP DNS appliance can be configured to accept GSS-TSIG signed DDNS updates from multiple clients in a realm or multiple clients that belong to different AD domains in which each domain has a unique GSS-TSIG key.
Prerequisites
The following are prerequisites for GSS-TSIG support for secure dynamic DNS updates:
- At least one EfficientIP appliance acting as an authoritative DNS Server (Primary).
- Microsoft Domain Controller to generate a keytab file.
- The time must be in sync between Microsoft Domain Controller and EfficientIP DNS appliance with NTP enabled. “Use AD as the NTP server on EfficientIP”
- AD server using EfficientIP as DNS resolver to create the underscore service records if needed.
To create the A record for the AD: ipconfig /registerdns
To create the AD SRV records in the domain zone hosted in EfficientIP:
nltest /server:AD.EVAD.LOCAL /dsregdns - A Windows client which is a member of the domain and is using the EfficientIP server for DNS services
Notes
MS Domain name: evad.local “ case is insensitive”.
DC: ad.evad.local
Windows 10 client: DP-CLIENT-04
Realm*: EVAD.LOCAL “case is sensitive”.
EfficientIP authoritative DNS FQDN: auth-dns.evad.local
*Realm: “realm names come from the Kerberos authentication protocol, where they serve practically the same purpose as domains and domain names”.
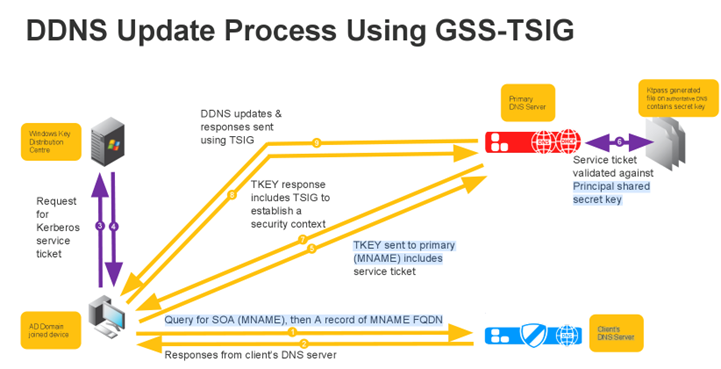
DDNS Update Process
- The DDNS client sends a DNS request to locate a domain controller and logs in to the domain controller.
- The DDNS client automatically sends a DNS query for the Kerberos Server.
- The DNS server replies with the name of the Kerberos server.
- The DDNS client automatically logs in to the Kerberos server.
- The Kerberos server sends the client a TGT (ticket-granting ticket).
- Using the TGT, the AD member requests a service ticket for the DNS server.
- The Kerberos server replies with a service ticket for that server.
- The client sends an unauthenticated DDNS update, which is refused by the DNS server.
- The DDNS client sends the DNS server a TKEY (transaction key) request:
o A transaction key record establishes shared secret keys for use with the TSIG resource record.
o the request includes the service ticket. The service ticket includes the appliance’s principal and proposed TSIG key, along with other items such as ticket lifetime and a timestamp.
o The DNS server responds with a DNS server-signed TSIG.
o The DDNS client and EIP DNS server now have established a security context.
- The DDNS client sends an authenticated DDNS update.
- The DNS server authenticates the DDNS update and processes it.
- The DNS server sends a GSS-TSIG-authenticated response to the AD member, confirming the update.
AD side procedure:
create a user in the active directory with the same name as the authoritative DNS server, this user will be used to create the Kerberos keytab.
The user name to be created will be “auth-dns.evad.local” the same as the authoritative DNS server name.
![]()
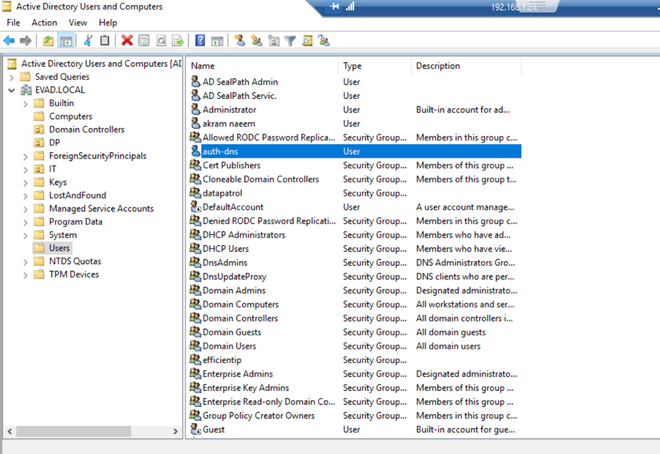
Ensure the password is never expiring and disable the user's ability to change the password. Otherwise, the keytab file must be updated every time the password expires and DDNS updates will fail until this is done.
Open CMD and run the below command to create keytab:
ktpass -princ DNS/auth-dns.evad.local@EVAD.LOCAL -mapuser auth-dns@EVAD.LOCAL -pass P@ssw0rd -out auth-dns.evad.local.keytab -ptype krb5_nt_principal -crypto all
EIP side procedure:
- Upload the generated keytab to EfficientIP.

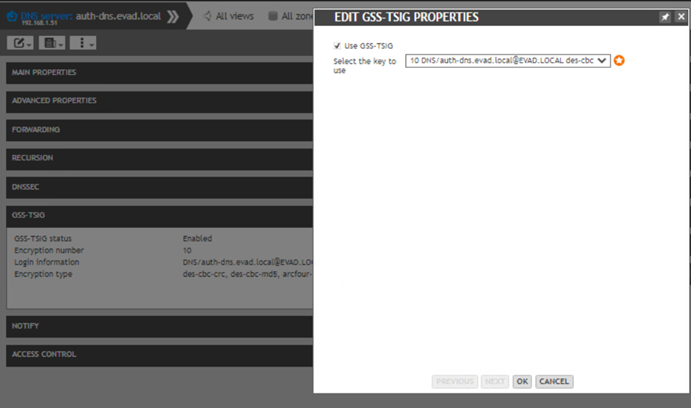
- Enable GSS-TSIG on the SmartArchitecture and select the GSS-TSIG on the physical server:
- From the properties of the domain zone change the allow-update to accept GSS-TSIG signed DDNS update requests.
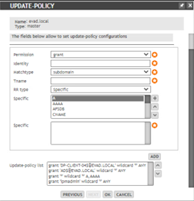
To allow the update from certain client or server add the following:
grant ‘DP-CLIENT-04$@EVAD.LOCAL’ wildcard “*” ANY
To allow the update from the AD server add the following:
grant ‘AD$@EVAD.LOCAL’ wildcard “*” ANY
To allow the update from any device joined to the domain add the following:
grant ‘*’ wildcard “*” A, AAAA
- We will do the same for the reverse zone:
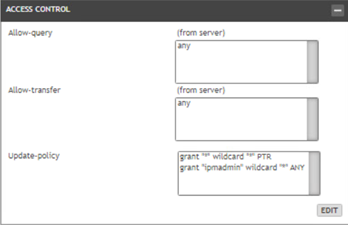
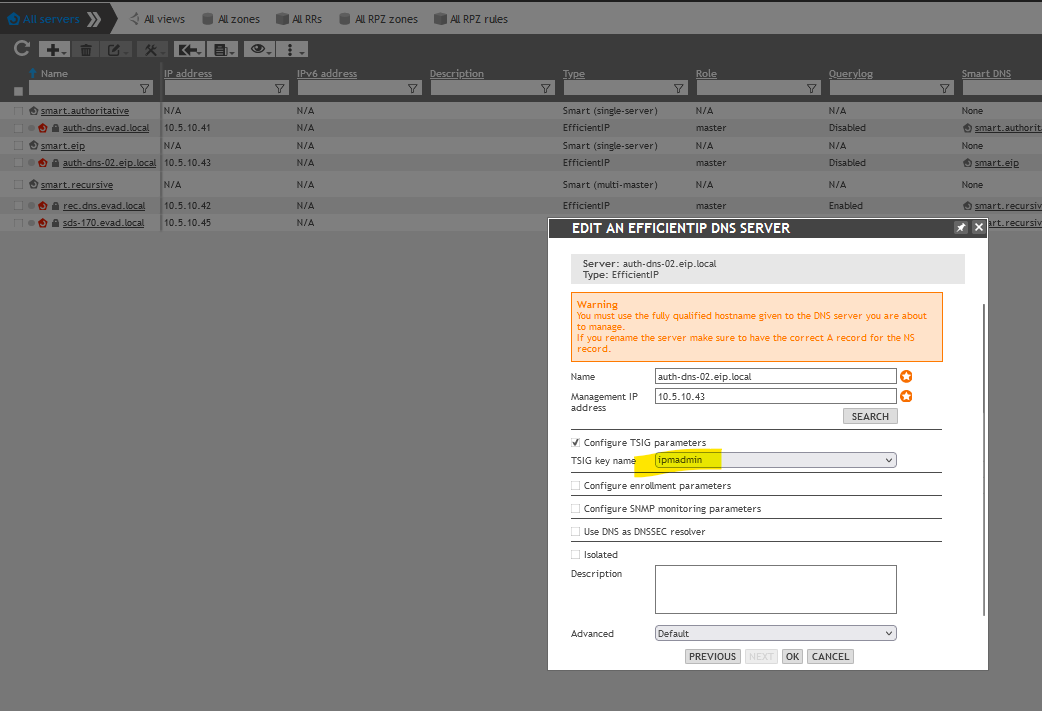
Make sure to allow the ipmadmin account to update the DNS, also select the TSIG Key name : ipmadmin from the edit of the physical server.
5. Try to manually register the DNS records from a client machine using ipconfig /registerdns
The first update request will be denied as it will be non-authenticated, the second try will be GSS authenticated


